Learn how to anchor a shed to concrete, soil, or gravel in a few steps. Taking the time to properly anchor your shed to a foundation is sometimes overlooked but it’s a very important step. Anchoring a shed increases its stability, makes it safe to be inside, and prevents your shed from taking flight during a windstorm. You can learn how to anchor a shed to a concrete slab, how to anchor a shed to gravel foundation, and how to anchor a shed without concrete.
Sheds can be anchored to a concrete slab, into soil, or into a gravel foundation. The work includes securing the shed frame to the foundation with either L brackets, expansion bolts, T-straps, ground augers, concrete piers, or mobile home tie downs.
How To Anchor A Shed to a Concrete Slab
Pouring a concrete slab is by far the safest, most stable platform for any structure.
Having concrete installed is expensive, however. It is also permanent, so if you aren’t certain that you want your shed in one location forever, concrete might not be the best idea. Budget it into your building costs when planning out your DIY build.
If you already have a concrete slab in place, your local regulations require it, or you have room in your budget, select one of the following methods to securely fasten your shed to concrete.
Expansion bolts with L brackets
Some prefabricated sheds will already have L-shaped brackets installed on the lower rim of their interior. It’s always best to use the manufacturer’s attachment points, if possible.
If your shed doesn’t already have mounting brackets installed, select enough L-shaped brackets of the appropriate size to properly tie down your shed.
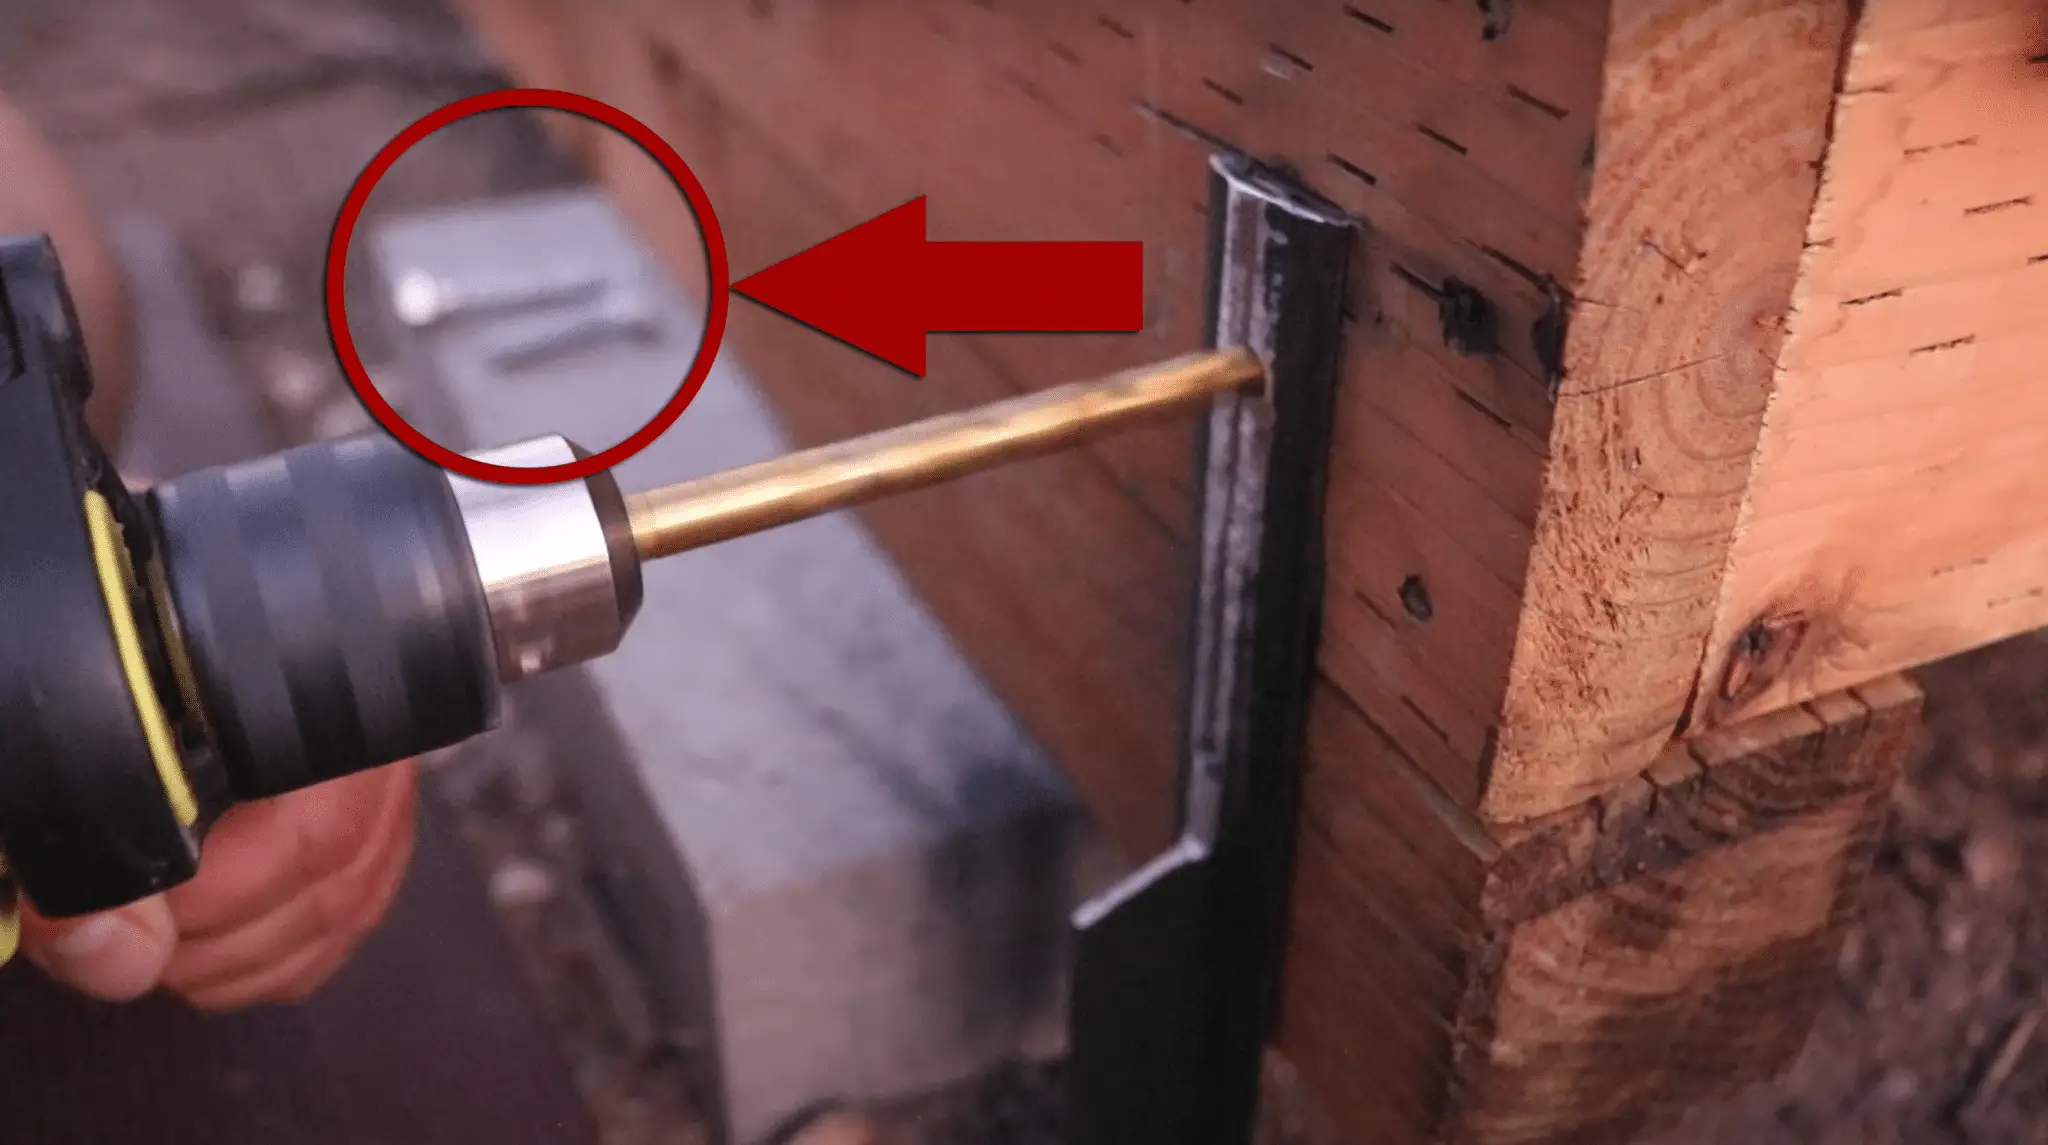
How To Install Expansion Bolts
1. Attach to the frame
Use carriage bolts or lag screws to install the brackets onto the bottom frame of the shed every 4 to 6 feet apart.
2. Drill into the concrete slab
Use a hammer drill and the correct-sized masonry bit to drill holes through the bottom slots of the L brackets into the concrete slab. Make sure you hold the drill as vertically as possible, and take your time. Double check that your holes are the correct depth.
3. Fasten the bolts
Place the expansion bolts into the holes, and tighten with a crescent wrench or a ratchet with the correct-sized socket to expand the bolts in their holes.
4. Trim the bolts
This is an optional step. Use a hacksaw or angle grinder to trim off the exposed threads from the tops of the expansion bolts.
Masonry screws and T straps
An option for smaller sheds is to simply attach T-shaped metal brackets, called “straps”, to the outer “skids”, or supports of the shed, and the outer perimeter of the concrete slab.
How To Install T Straps
1. Attach to the frame
Attach the straps to the shed with drywall screws. Install them in an upright “T” shape, with two points of contact secured to the wooden frame of the shed.
2. Drill into the concrete slab
Use a hammer drill and the correct-sized masonry bit to drill a hole into the concrete where it comes into contact with the lower slot of the T strap.
3. Fasten the screws
Use an impact driver to fasten the masonry screws through the T strap and into the concrete.
Pro Tip: Buy an extra masonry bit before you start drilling into concrete, especially if you plan on anchoring in several places. Masonry bits dull easily, and thinner ones are prone to breakage.
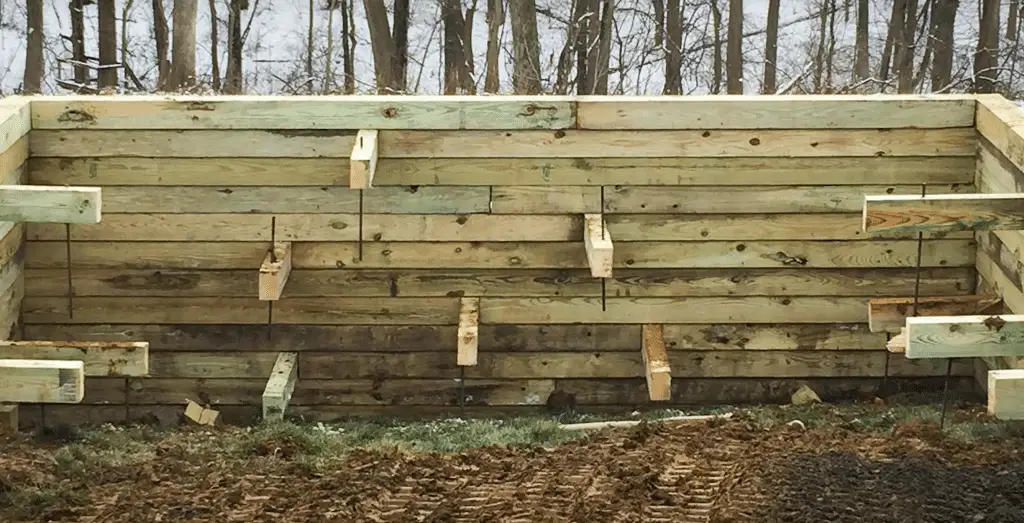
How To Anchor A Shed To Gravel Foundation
Anchoring a shed to a gravel foundation is often accepted as the least expensive and most practical method for most homeowners.
After all, gravel is cheap, and when properly installed it can provide an extremely sturdy base for a lightweight structure. It also allows for excellent drainage (even better than concrete!).
Perhaps the most appealing characteristic of a gravel foundation is the ease of installation— Any homeowner with intermediate construction skills can build one, and it only requires common hand tools to complete the project.
Pro Tip: Whichever anchoring system you choose, be sure to have your project inspected by your local permit office BEFORE you lay down gravel on top of it!
As described above, ground augers may be perfectly suitable for securing your shed into the soil below your gravel foundation.
Concrete Piers Or Pillars
The most suitable method for anchoring a shed to a gravel foundation is taking the time to properly install concrete piers, or pillars, and connecting the frame of the shed directly to them. You might also hear these structures referred to as footings, pilings, or bollards.
How to Install Concrete Piers
1. Determine how many piers you will need
Installing one pier under each corner is fine for smaller sheds. For more support, you will need piers along the length of larger structures as well. Your shed’s manufacturer and your local permitting office will help you determine how many piers are required.
2. Dig the holes for concrete piers
Use a post-hole digger or rent a two-man earth auger to dig or drill the holes below the frost line. This is generally 3-4 feet below the level of your lawn. Passing below the frost line will help to prevent your concrete piers from moving.
3. Insert sonotubes
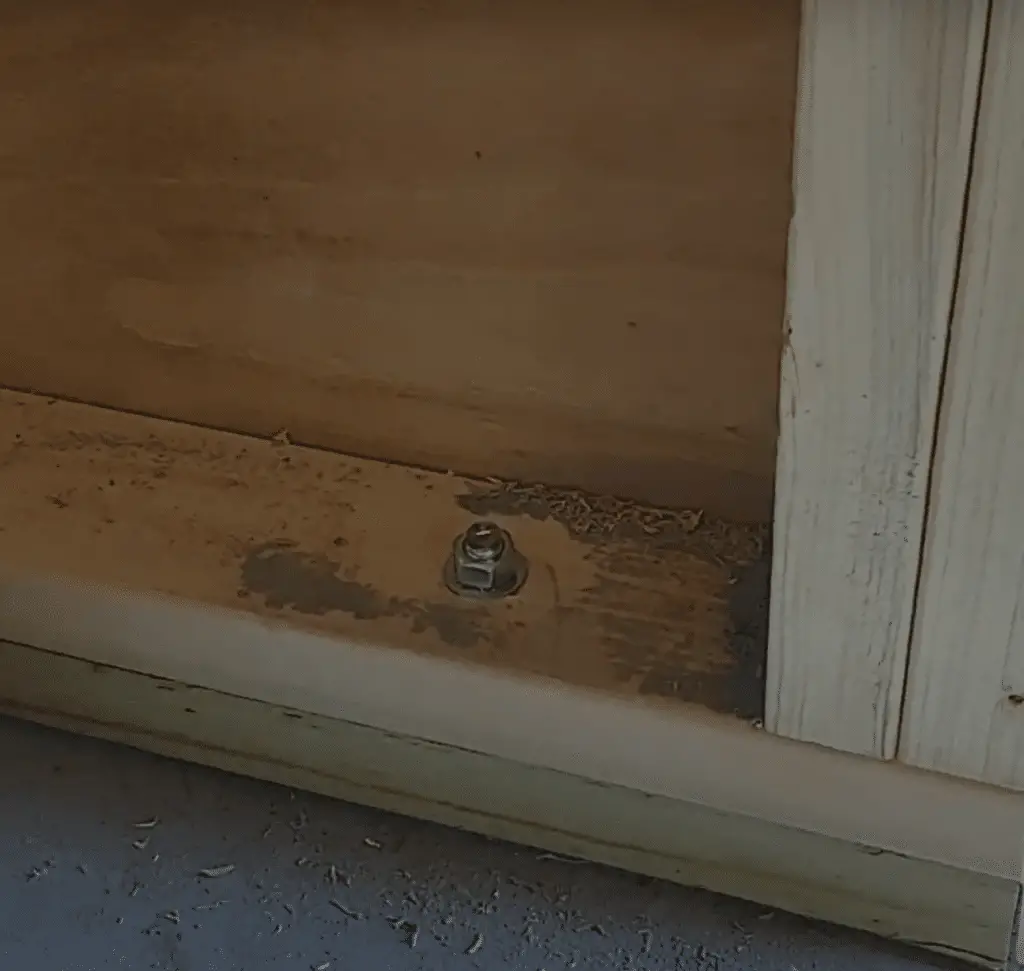
Insert appropriate-sized sonotubes into the holes, and add 6 inches of gravel to the bottom of the holes. Make sure the tops of the sonotubes are all the same height, since this is where your shed will be anchored.
4. Fill with concrete
Mix enough Quikrete or other fast-setting concrete mix to fill each sonotube to the top. Insert anchor bolts or brackets before the concrete hardens. Be sure to align your bolts or brackets to the proper orientation for the shed layout.
5. Install the gravel and attach the shed
Once the concrete is fully cured, you can install the gravel over it, making certain to leave space around the anchor bolts or brackets. Move the shed onto the anchors and fasten it to the concrete piers. Fill in and level any empty spaces with extra gravel.
How To Anchor A Shed Without Concrete
If you don’t like working with concrete or don’t want to spend the time, there are ways to anchor a shed without concrete. You can anchor a shed to soil with ground augers or mobile home tie downs in 3 steps.
How To Anchor A Shed To Soil
If you are on a tight budget, choosing to secure your shed directly into the soil of your backyard is the most inexpensive option.
You will need to be extra cautious of exposure to the elements and pests if you go this route, however. To protect your investment, be sure to install a plastic moisture barrier between the ground and the bottom of the shed.
Take the time to look over your local building code, as well. While most prefab plastic sheds will be fine to install directly onto your lawn, many municipalities prohibit wooden-framed structures from coming into contact with the soil.
Ground Augers
Regardless of whether the manufacturer of your shed suggests it or not, it’s always a good idea to fasten your new purchase to the earth with a set of ground augers.
Although there are several brands of ground augers on the market, their basic principle is the same. They consist of a length of metal rod with a corkscrew-shaped attachment that is inserted into the ground on the bottom end, and a loop or attachment point for a length of cable at the top end.
How To Install Ground Augers
1. Screw into the ground
Depending on the type of auger you purchase, you will either need to connect a power drill to the top of the auger, or pass a length of rod through a loop at the top to screw the auger into the ground. Be careful to avoid drilling into rocky areas.
2. Cut and crimp cables
Determine where you will attach your steel cables to the shed. Cut the cables with enough extra length to create a wire crimp on both ends.
3. Attach the cables
Loop the crimped end of one cable through the top of the ground auger. Extend the cable to its attachment point on the shed, and pull tight. Mark the length and install a wire crimp on the cable. Attach to the shed. Continue for all cables and augers.
Pro Tip: One of the most secure ways to tie a shed down to the earth is to pass the length of steel cable over or through the top of the shed and connect it to a ground auger on the opposite side.
Mobile home tie downs
Another good method for anchoring a shed directly to the soil is to use mobile home tie downs. Since these heavy-duty straps are considered safe for residential use, they are certainly strong enough to hold a backyard shed!
There are a variety of mobile home tie downs that can be connected to just about any type of ground auger or concrete anchor.
The ground auger attachment system and mobile home tie downs can also be useful when installing lighter sheds onto a gravel foundation.
Pro Tip: Avoid anchoring your shed to pavers! Pavers may be fine for a lightweight, temporary structure in an area that gets very little wind. As a rule, however, if you can lift it, the wind can too!
Final Thoughts
Regardless of which type of foundation you have, or which method you use to anchor your shed to the ground, if you take the time to do it properly you can rest assured that your structure has a safe, stable footing that will last for many years!